
I had a requirement from a client recently to show all list item attachments on the various task forms in an approval process – which, if you think about it, makes total sense. With any project, we always have a common goal of making the user experience as seamless as possible for our users and approvers. So, why wouldn’t we provide all pertinent information needed (including related documents) to complete the requested review and approval, right there on the task form?
I found a post on Nintex Connect which walks through meeting this requirement by leveraging a custom action created by Nintex Technical Evangelist, Vadim Tabakman. But, what if you don’t have access to deploy a custom action to your SharePoint environment? In this case, I actually didn’t have access to the client’s server. So, I decided to come up with a solution that would produce a similar outcome, without the need for any custom actions.
The Workflow
Get Attachments
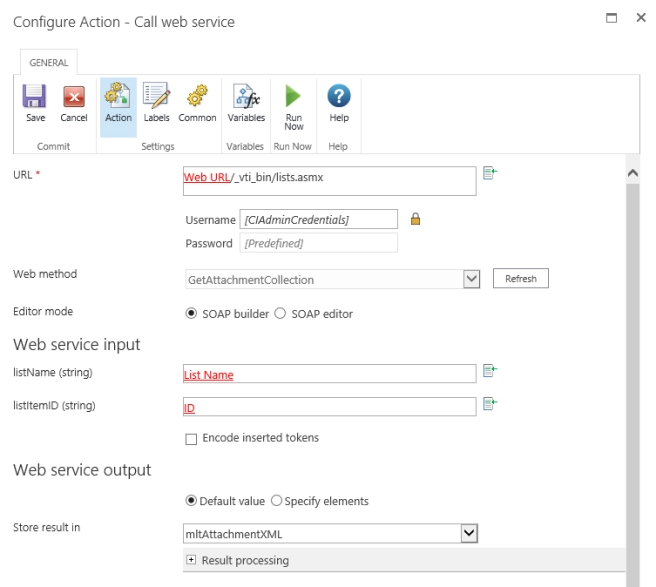
First we need to get all of the attachments from the current item and store the URLs to a collection variable. We do this with the Call web service action, where we leverage the SharePoint Lists web service and the GetAttachmentCollection web method. We set the listName parameter to use the current List Name, found in the Common section of the dynamic references, and the listItemID parameter to use the current item ID. Lastly, we provide a multi line of text variable to store the XML result.
Next, use the Query XML action to parse through the web service result and get a collection of attachment URLs.
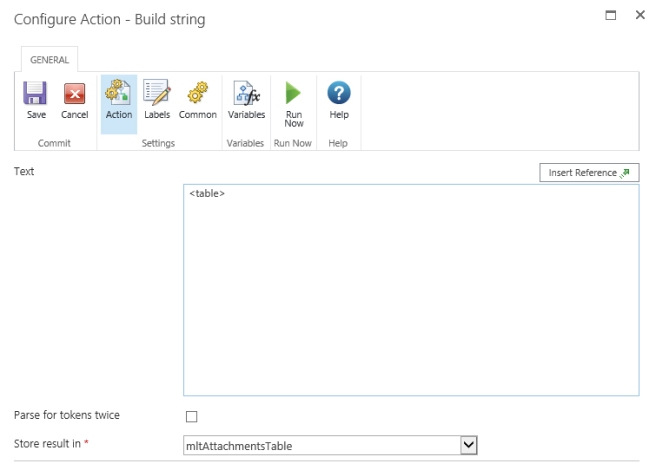
Start an HTML Table
Now that we have a collection of URLs, we need to format this in a way that will be user friendly on the task form. So, we will dynamically generate an HTML table, based on how many attachments were collected. We use a Build string action to start our table and store to a new multi line of text variable. We will use this same variable as we add each component to our HTML table.
Loop Through the Collection of URLs
We use a For each action to loop through each URL in our collection and dynamically build out the rows in our table.

Side note: Within the For each, I like to use the Log in history list action to write out the current URL each time we loop through the collection items. This is helpful to track the progress of your workflow and to see where we are in the looping process.
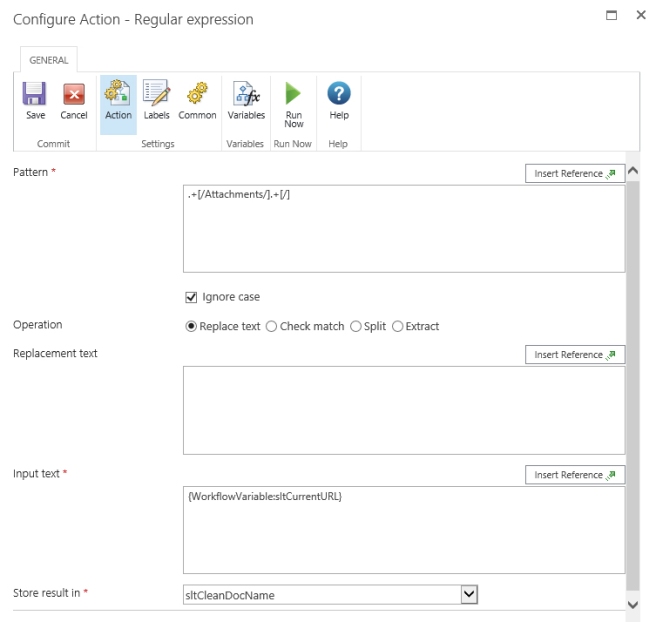
Get Each Document Name
I wanted to replicate the way that attachments are displayed on a list item form by default, where the document name is the clickable text that you see. After investigating the format of all of the URLs, I determined that each one had a common pattern just before the file name – /attachments/123 (where 123 represents the current item ID). So, we use the Regular expression action to target on that pattern, strip everything before the file name, and store the clean name to a single line of text variable.
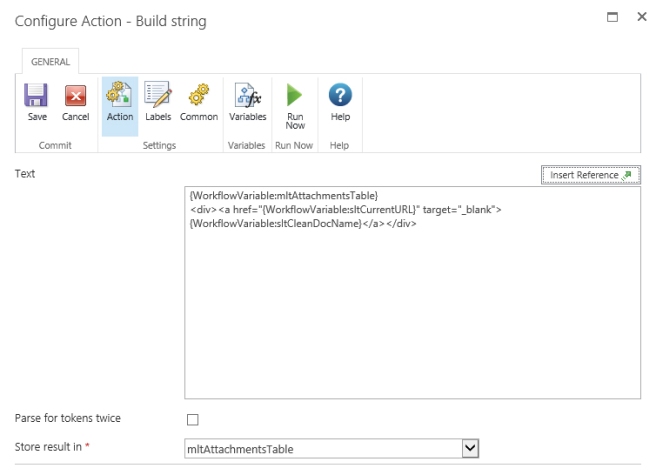
Add a Row to the Table
Once we have the URL and the document name, the last step within the For each action, is to add a row to our HTML table using another Build string action. We start by inserting a reference to the multi line of text variable in which we stored the start of our HTML table. Then, add some additional HTML for a single row with a hyperlink, and store back to the same variable.
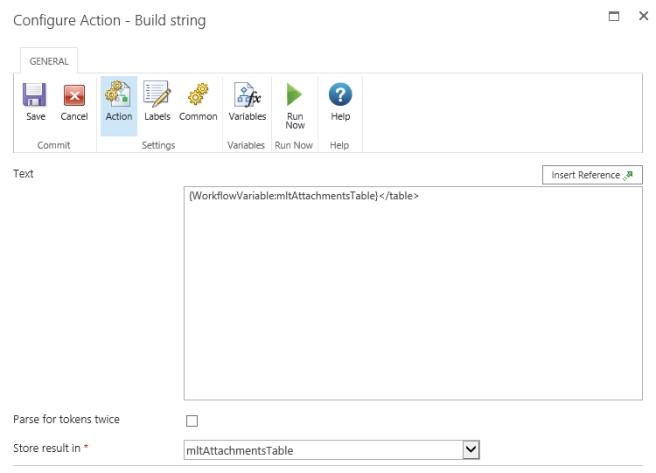
Close the HTML Table
Just outside of the For each action, we use one more Build string action to close out our HTML table and we are ready to go.
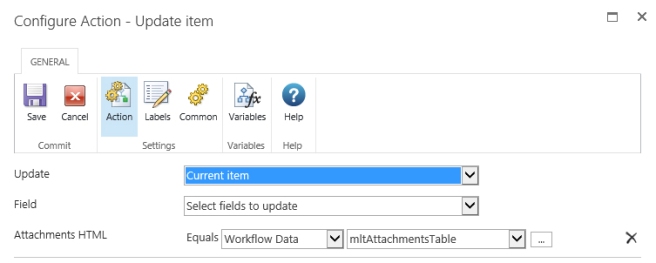
Populate List Column
Once we have collected and formatted all of the data the way we want it, we are almost ready to add it to our task form. I found that if we add the variable directly to the task form, it comes through as literal HTML instead of the formatted list of hyperlinks that we want. So, we need use a list column instead. Which means, the last step before adding our HTML to the task form is to create a new multi line of text column on our list and use the Update item action to populate that column with the value that was collected during our workflow.
Task Form Configuration
Now, we are ready to add the attachments onto the task form. Within the task action configuration in Nintex Workflow, open the Nintex Forms designer by selecting “Edit Task Form” from the ribbon. From the Nintex Forms designer, add the Attachments HTML list column onto the form and then update the following two configuration settings:
- Expand the Appearance section and set Enabled = No
- Expand the Advanced section to set the Control Mode = Display

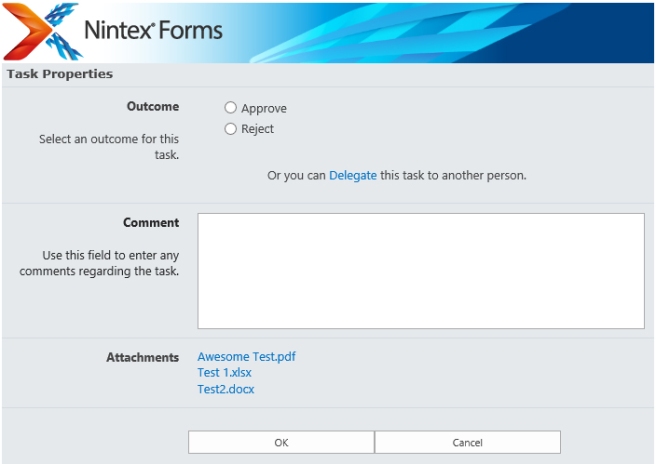
The Final Task Form
And that’s it, friends! We now have a Nintex task form which also displays the related documents for the corresponding list item on which we are approving.

Nicole – I also provided the below as a comment to your blog posting on the Nintex Community site:
Of course, on your page here, the screen shot images I provided do not copy/paste.
Nintex WF 2013
sharePoint 2013
Windows 7, IE 11
Nicole – thank you for the great step-by-step detail. I’m getting a partial result as seen below – perhaps you could identify where my misstep is – also a couple of questions if I may:
1) This is the result I get after running the WF – Clearly I’m missing something when I get to one of the later action steps in the Loop
2) in the detail for Calling the Web Service, this is what I have, which seems to be working.
My question is, are there values that I can use other than my own Username and Password, as our passwords are changed frequently – perhaps I’m not reading your guidance correctly?
3) In your detail for the step for getting a sltCleanDocName, are the punctuations commas or periods? This is what I understood you to mean, using periods: .+[/Attachments/].+[/]
4) This is what I have for the last step in the Loop, adding rows to the table
5) Lastly, I chose to run the workflow as a Start WF action step at the start of the Request Approval WF. Is there a best practice where this WF should be initiated? I assumed as long as it was run before the Request Approval WF was acceptable.
Any assist you could provide would be appreciated.
LikeLike
Hi Mark – Happy to help!
1. Is this the screenshot of the data when placed on your task form? Are you writing the Multi Line Text variable to a Mutli Line Text list column? This has to happen in order for the data to display correctly. If you try to put the variable directly on the form you may end up with unexpected results.
2. Yes, you can use a Workflow Constant as an alternative for hard-coding your personal credentials into the WF. We typically recommend that our clients create an account to be used for admin activities with a password that never expires. Even if you aren’t able to get access to an account which doesn’t expire, putting your credentials into a WF Constant is a better practice becasue when your password changes, you only need to update it in one place (the WF Constant) and all actions in all WFs that are leveraging that WF Constant will get the latest password. Here is more information re: WF Constants: https://help.nintex.com/en-US/nintex2013/help/#Workflow/RootCategory/Designer/Nintex.Workflow.WFConstants.htm.
3. Yes, you are correct. Periods, not commas.
4. Looks good to me.
5. Yes, as long as you run these actions before the task is assigned, it should work.
Let me know if this gets you anywhere.
LikeLike
Thank you Nicole for your reply.
I’ve left a detailed response with answers to both 1 and 2/
Regards
Mark
LikeLike
Hi Nicole, thank you for the detailed info here ! I have a question, can be the attachments included into task form clicked and opened from there? I mean, I have the attachment names into the task form but when user clicks over the link nothing happen… could you please help?
LikeLike
Hello – The outcome of this solution should be clickable attachment links. The GetAttachmentCollection web method should return URLs for all attachments.
LikeLike
Hello Nicole, really a great solution for me. I have been able to implement them on the basis of a SharePoint 2010. I still have a problem with image attachments that are opened in the form field rather than in a new window. Do you have an idea for that?
LikeLike
Hello – I just tested the solution with an image file and it opened in another window/tab as expected. I confirmed this functionality in Nintex for SharePoint 2016.
LikeLike
Awesome!!! (I’m still disappointed that Nintex doesn’t just let you connect to the “{Item:Attachments}” or something like that. But this is a great workaround!)
A few notes that might help someone else: Logging didn’t work for me (I’m a relative Sharepoint/Nintex “newbie”, the log list is larger than 5000 items and I couldn’t figure out how to filter it by today) so I just temporarily added a “DebugAttachments” control to my approval form and attached it to the “mltAttachmentsTable” so I could see the raw HTML. That told me where I went wrong.
Also, it took me a few minutes to figure out your prefix system. “slt” stands for “Single Line of Text”, “mlt” stands for “Multiple Lines of Text”, “col” stands for “Collection”.
Like I said, awesome! And I learned a LOT from this!
Thank you!
Lowell
LikeLike
I’m stuck at a step. On the last update item I am confused on the Attachments HTML as I don’t have any option like that.
LikeLike
Hello – You must create a Mutli-line text list column (I called mine “Attachments HTML”). After you’ve done that, edit the Nintex Task Form with Nintex Forms. Within the Nintex Forms Designer you should see the “Attachments HTML” list column in the toolbox on the left. Drag that onto the canvas and you should be good to go.
LikeLike
This worked on Nintex 2010! One important detail though….Choosing “Enhanced Rich Text” for the multi line column makes the attachments text in the form vertical and scrambled. Choosing “Rich Text” instead makes this work perfectly. Thank you!
LikeLike